Hollywood Motion pictures are known for the shots you remember; the rock rolling down the temple corridor just behind Indy from the opening of Raiders of the Lost Ark (1981), the amazing Steadicam shot following Sylvester Stallone up the museum steps in Rocky (1976), the fast-paced action car sequences in The Fast and The Furious (2001). But about 80% of a typical motion picture is made up of close-ups of people having conversations. And by far the most commonly used lighting setup for such a close-up shot is the far-sided key. Master this one simple lighting setup and suddenly 80% of your shots will look “Hollywood.”
So what the heck is a far-sided key?
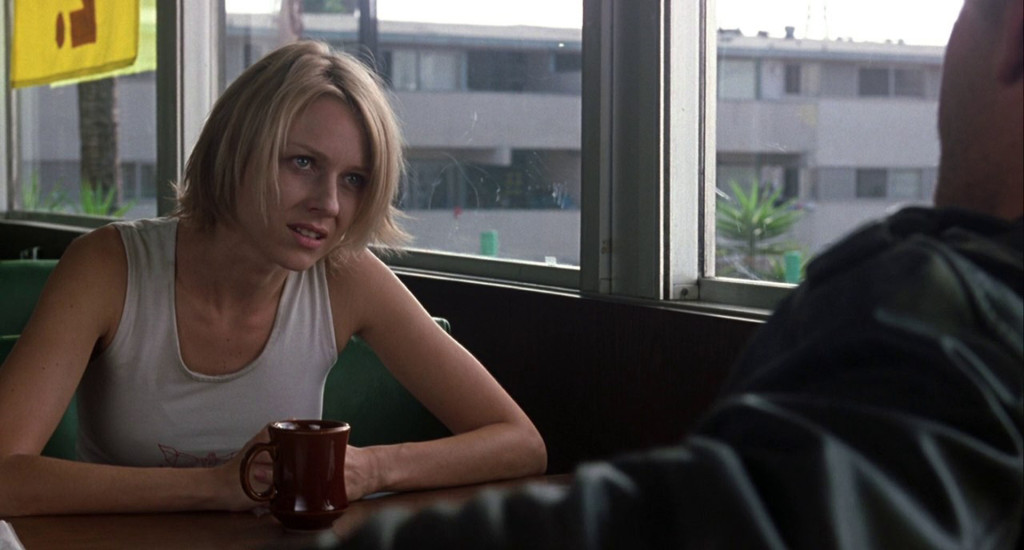
Well let’s start with what it isn’t. It is not a near-sided key.
Imagine a close-up shot of a leading lady as she converses with her leading man who is off screen to camera-left. She will be placed on the right side of the screen, looking toward the left. Consequently the left side of her face will be near us and the right side of her face will be on what we call the far side, the side not near the camera. If she is shot in a profile we will see nothing of this far side of her face at all. But even if she is talking to a leading man who is positioned right next to our lens and we see much of the right side of her face, the left side will still be slightly more prominent.
Jennifer Lawrence in Winter’s Bone (2010)
The classic 3-point lighting scheme taught to all first-time lighting students places a key light on the right side of the set hitting her right (or near) side, a fill light from the left side to fill in the shadows created by the key light, and a back light from straight behind to separate her from the background by highlighting her hair and shoulders.
This is the setup that every student learns and the one that no cinematographer actually uses. (Well, almost never uses – I had to hunt a long time to find that example shot above.)
So how about that far-sided key?
Let’s start with the exact same setup of our leading lady.

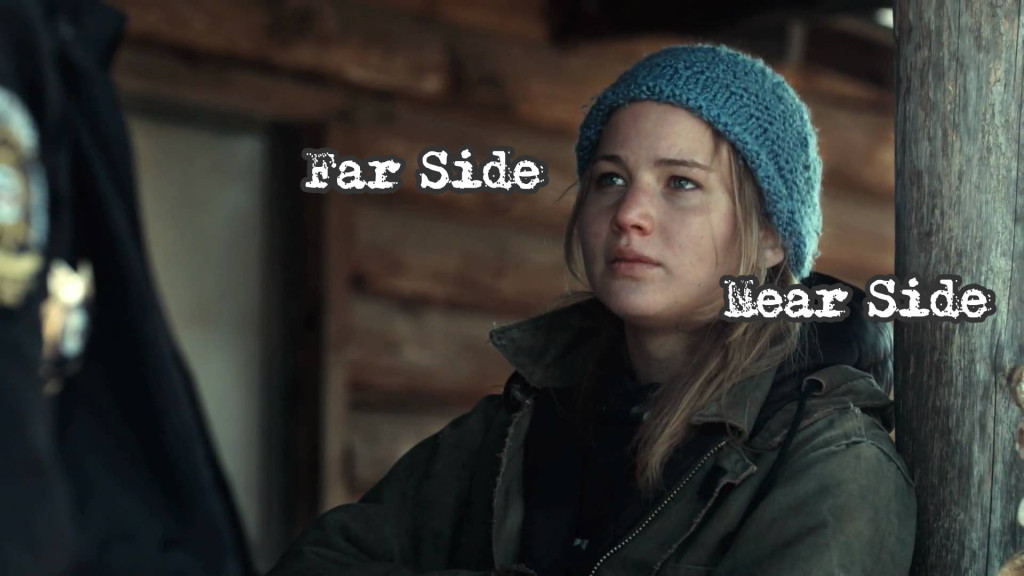
A far-sided key arrangement places the key light for our leading lady so it strikes the far side of her face first.
In our example the key light will come from the left side of our screen and slightly behind her with the key light typically just out of our frame.

Light from the key will strike her right far-sided cheek first and will throw the shadows from her nose and face onto the left side of her face, the side facing us. This may at first seem counter-intuitive, to have the main source of light come from essentially behind our character and fill the side of her face we see the most with shadows. But it produces a much more interesting lighting of her face.

Jennifer Lawrence in Joy (2015).
Those shadows help to define the lines and contours of her face. See how the light from the key light behind her falls over her left cheek, creating that triangular patch of light? It’s such a classic lighting effect it’s named for one of it’s most ardent proponents, some guy named Rembrandt van Rijn. You may have seen his work:
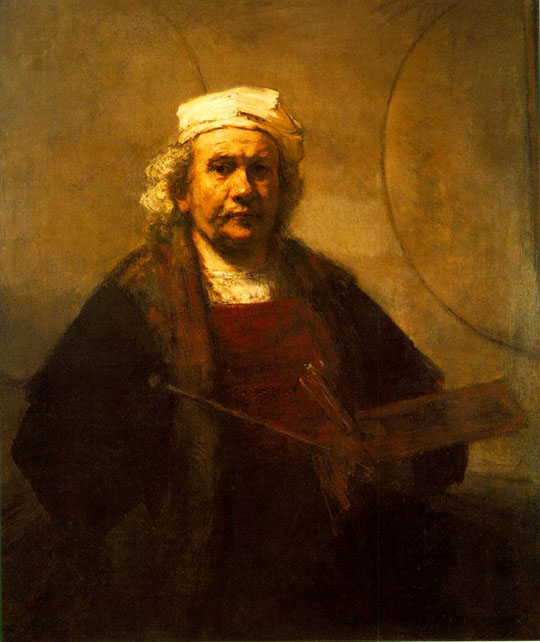
Rembrandt Self-Portrait, 1659-1660
So if it’s good enough for a master painter it’s probably good enough for films and television. Watch a few minutes of your favorite movie or TV series and you’ll find a preponderance of far-sided keys.
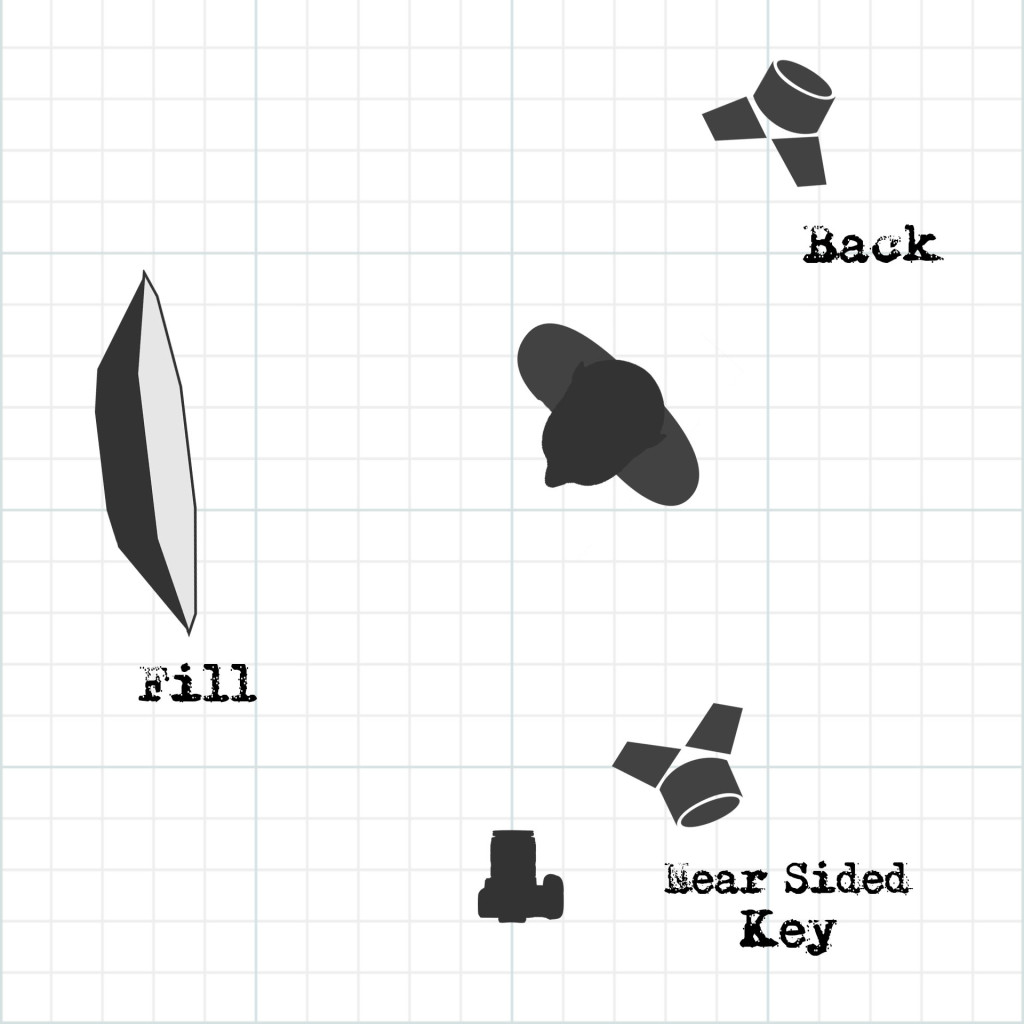
Let’s take a look at a typical far-sided key setup:
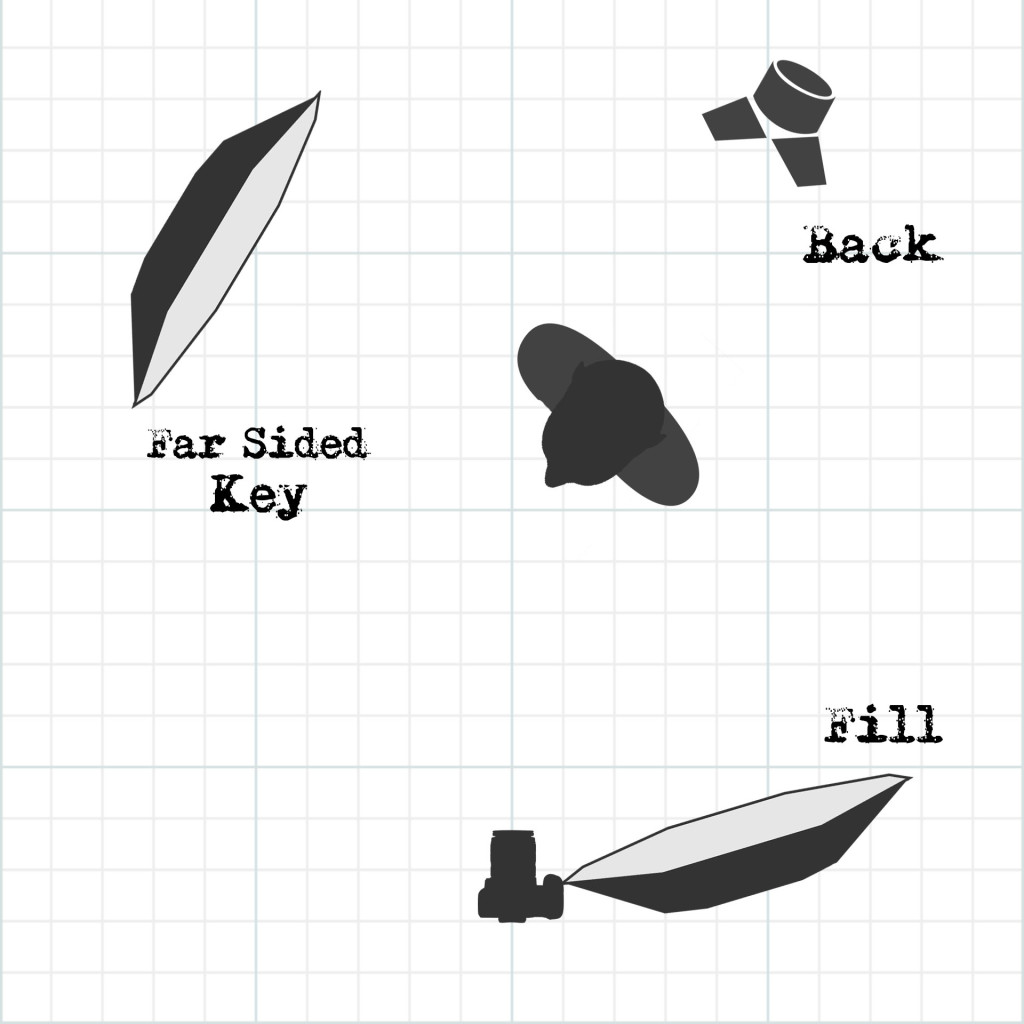
Let’s look at each light one by one. First up is the key light shown here as a large softlight off-screen on camera left, aimed at the far side of our actor’s face. The light from this key strikes her face, illuminating the far side, and casting shadows from the nose and the cheek onto the side of her face nearest to camera. By adjusting the position of this key light carefully we can create a variety of interesting looks, everything from a classic “Rembrandt” triangular patch of light on the near side cheek to a nearly completely shadowed near side face, almost a silhouette.
Since our single key light gives no illumination to the shadowed areas of our actor’s face we next add a soft fill light from very near our camera, perhaps a little to the near side of our actor. This less powerful fill light brightens up the shadows created by the key. The more fill we use the more “daytime” the resulting image. Almost no fill for night scenes, drama, etc; lots of fill for daytime scenes, white hospital rooms, comedy movies, etc.
Finally, to help separate our actor from the background we often use a small wattage fresnel back-light from behind and on the opposite side from our key light.
We’ve show our key light as a large, soft source, but hard keylights work equally as well with a far sided key. And in many situations, film noir style lighting in particular, they are the obvious and quite beautiful choice. For ease of lighting however always combine them with a soft fill light.
What about the Real World?
One of the nicest aspects of the far-sided key is the large number of real-life situations in which you’ll find this actual lighting and how wonderfully it mimics those situations in our movies. Any time the predominant light source comes from behind a character, especially when that light source is supposedly seen on-screen, we find the far-sided key a perfect choice.
A character in a house with daylight coming from a window seen behind or to the side of them? A far-sided key…
Mulhollannd Drive (2001)
A character in a car seen from inside the vehicle with daylight beyond? A far-sided key…
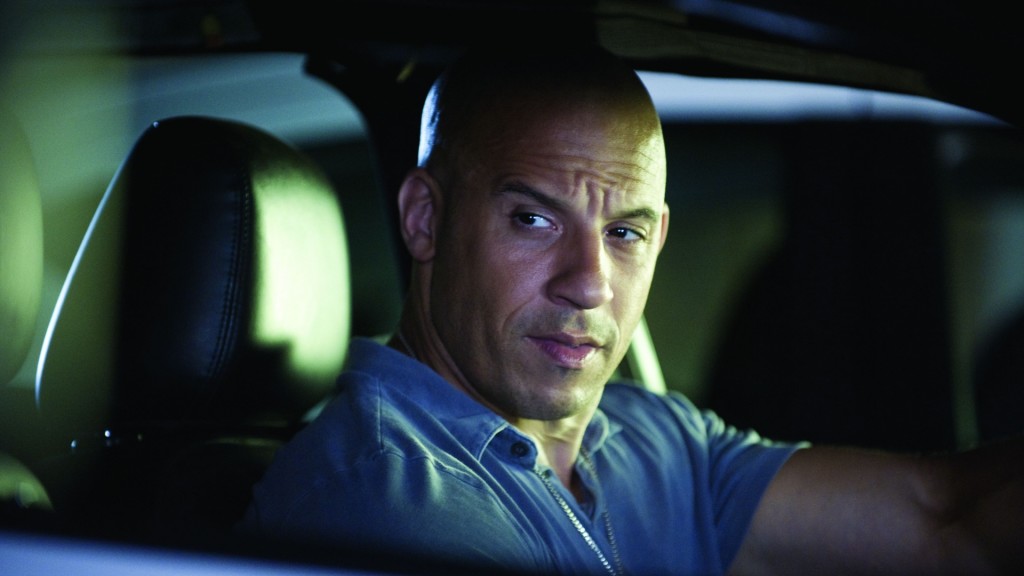
Fast & Furious (2009)
Characters in a darkened room lit only by a lamp or a fireplace seen in the shot behind them? A far-sided key…
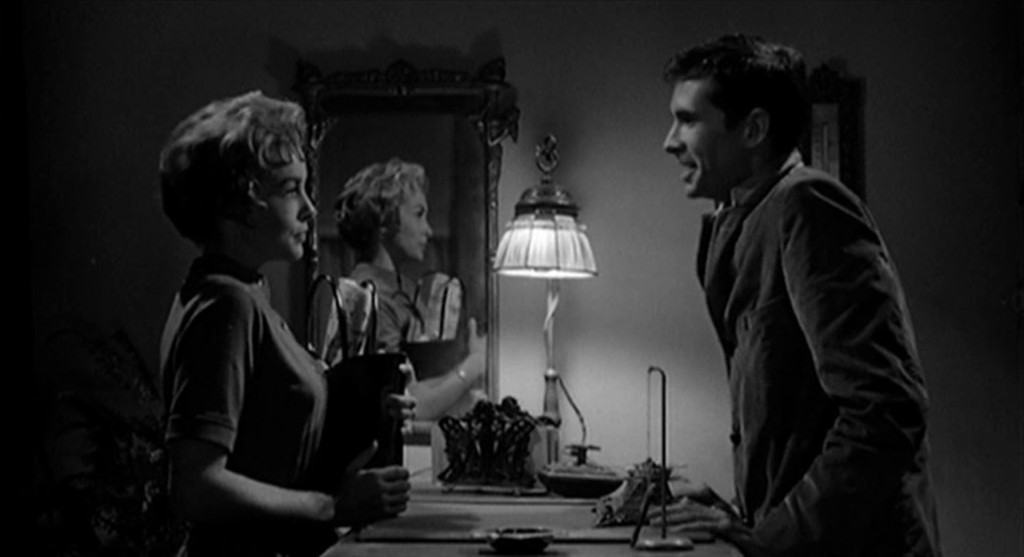
Psycho (1960)
Of course in these situations the light that’s actually hitting the subject is often NOT coming from the source we see on screen. We call the light source on screen the motivating or “practical” light source and while it appears bright on screen it is usually not bright enough nor perfectly placed to light our actor’s actual faces. Instead we use an off-screen fixture to mimic the light that would come from the motivated or practical source.
In fact let’s take a look at exactly how we’d light two people in a scene together like the example shot from Psycho above. First, here are our two actors and the practical light between them.
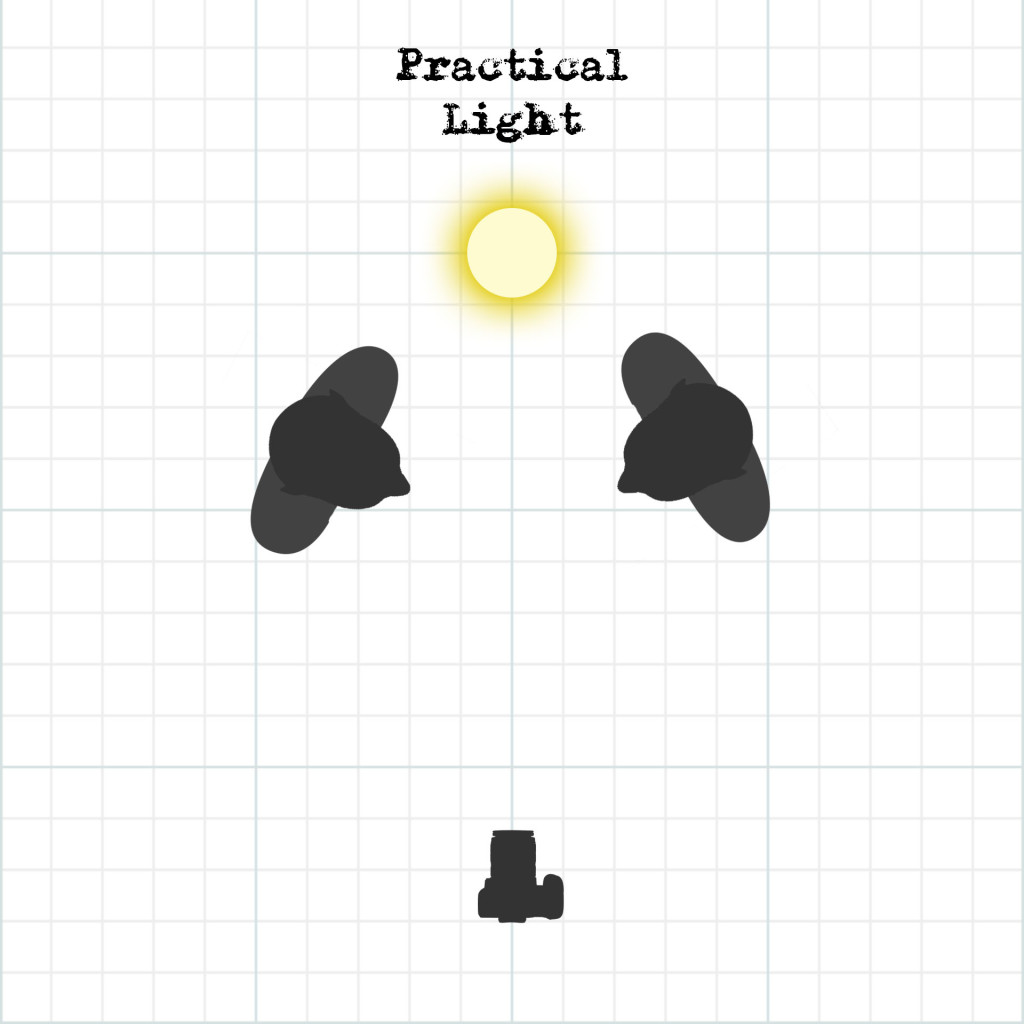
Because the practical light is visible to our camera we must reduce the intensity of light it produces so as to not blow out the shot. Typically we use a small-wattage light bulb and attach the fixture to a dimmer so the brightness of the light can be reduced even further.
Because we have reduced the intensity of the practical light it doesn’t cast enough light on our actor’s faces for a correctly exposed image. So we need to add more lights to simulate the light that would be hitting them from the practical light if it were bright enough. Let’s start by adding a single far-sided key light to illuminate the actor to camera right
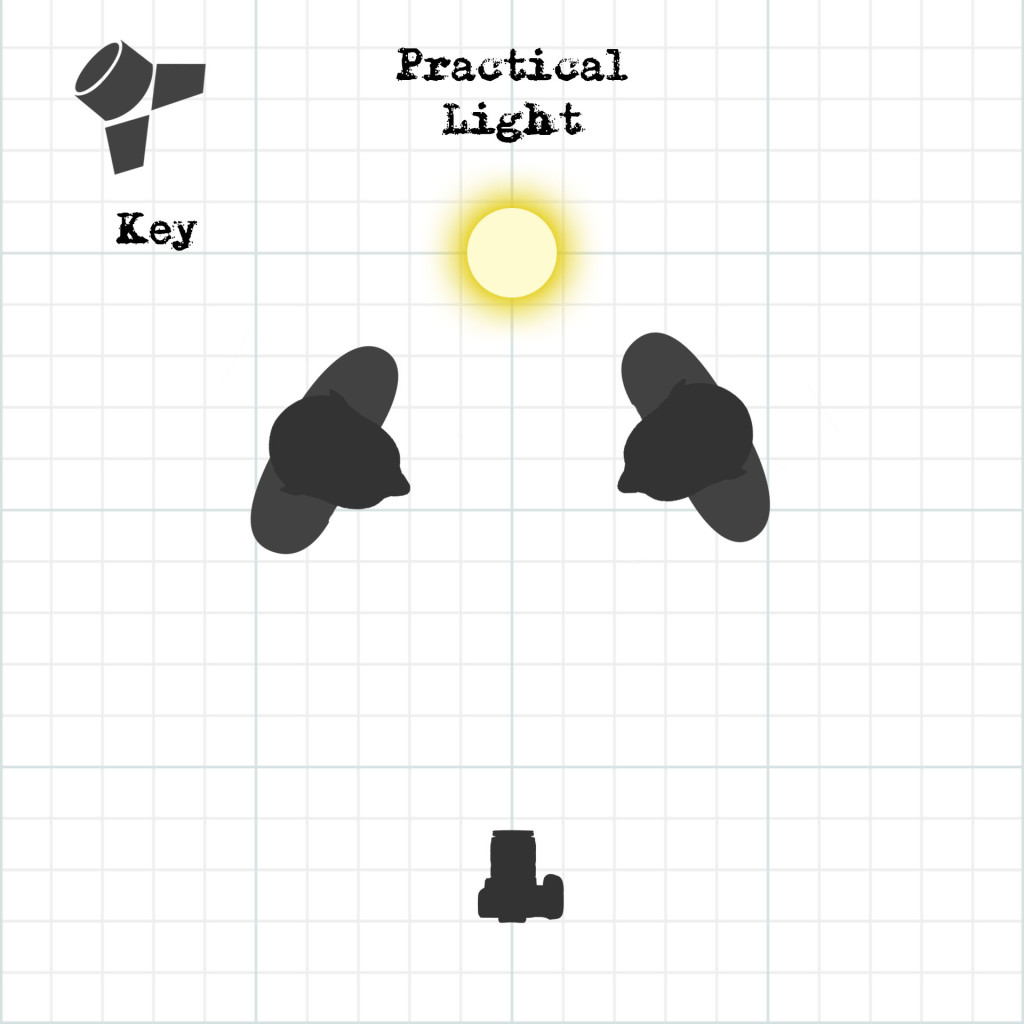
Our key light comes in from the left side of the set, shooting past the player on screen left, and lighting our player on screen right, from their far side. This simulates the direction from which the practical light would hit them.
Notice however that because of the placement of our actors it will be very difficult to keep the light from our key from illuminating the player on screen left. It will naturally strike them from behind as if it was a back light. And indeed, that’s exactly what it is. Our single movie light on stage left is BOTH a key light for our stage-right player AND a back light for our stage-left player!
By adding in a second matching key light from stage right for our left-hand actor and a soft fill light directly over our camera we create a quick and easy lighting setup that works perfectly for almost any two-shot
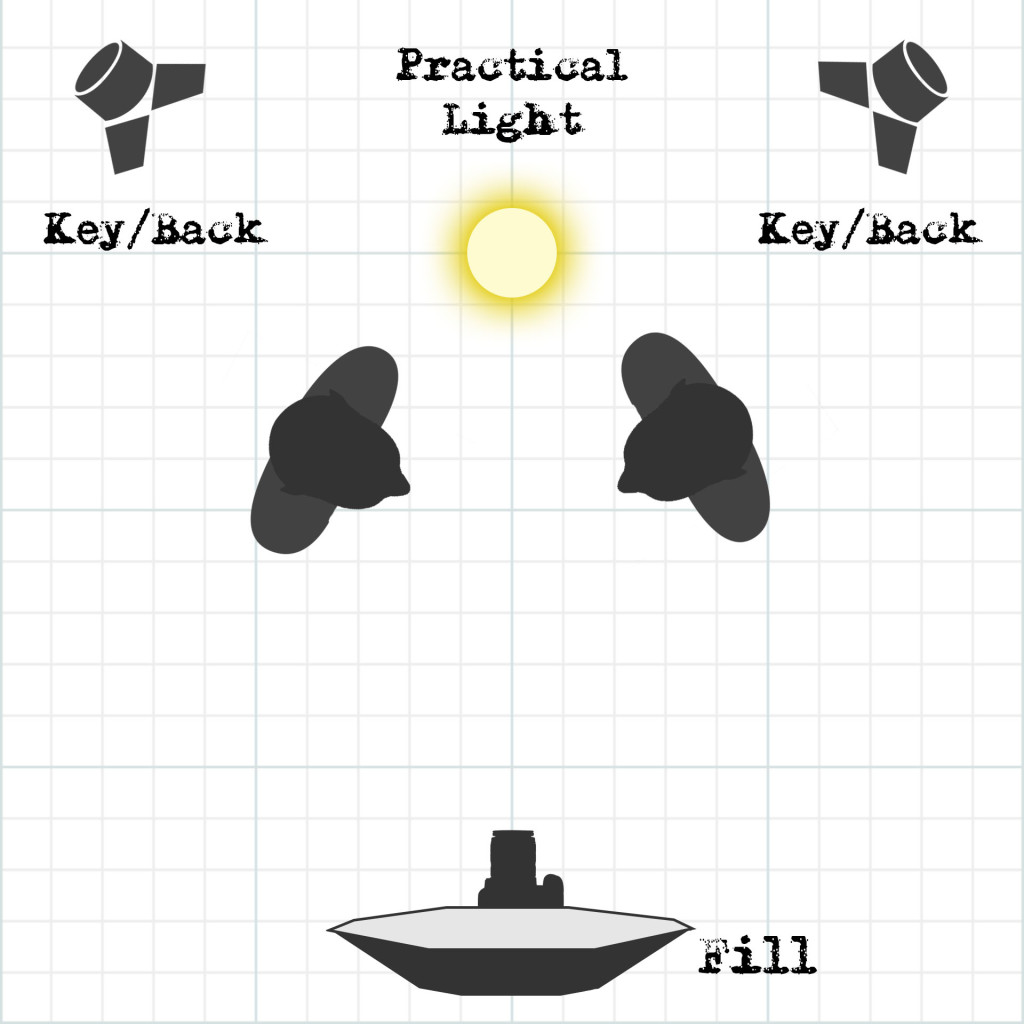
We must be careful in mixed light situations to match the color temperature of the practical light source with our key fixture. Tungsten light to simulate an on-screen practical table lamp for instance and Daylight balanced fluorescent tubes to mimic light from an on-screen window looking outside. For shots of single actors our back light will often use the opposite color temperature for color contrast.
What About Sunlight?
Far-side keys also work wonderfully for true outdoor scenes, where you use existing sunlight to key light your actors. Throughout most of the day sunlight comes from a terrible direction for use as a traditional near-sided keylight. It’s too high or too low, and often very, very harsh. But switch to a far-sided key setup and things become much more manageable.
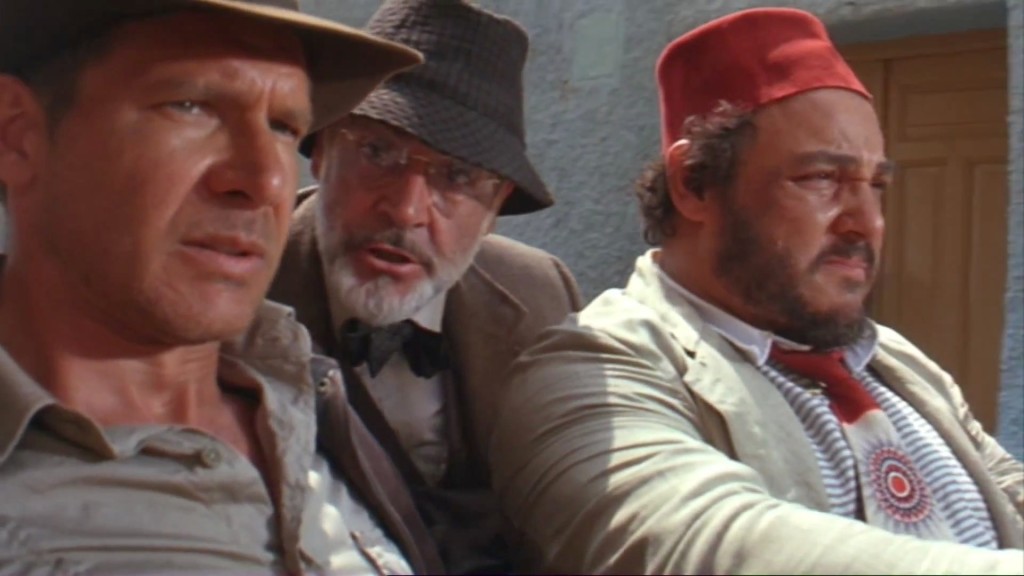
Indiana Jones and the Last Crusade (1989)
Simply place your actors with the sunlight coming from behind and to the side of their faces, fill with a piece of white foam-core paneling, and bounce in some additional sunlight off a small shiny board as a back light. Remember to shoot quickly however as sunlight never stops moving.